Removing Splinters

This time of year is always busy for me, as I hang out in the garage a lot….making wood tombstones to sell. I love creating new designs and definitely, working with any wood project that I might get into!  Right now, I am smiling from ear to ear as I create some awesome tombstones that everyone loves. Thanks so much, if you have purchased one of my handmade designed wood tombstones – – removing the splinters from my fingers is my reward for your happiness!

Working Hard

Here’s me and my good ole Craftsman Evolv Jigsaw hard at work!

Boogie Tombstone

This is one of my wood tombstones as I work on cutting out the boogie man’s face in the tombstone. It is not as easy as you may think to do this.

Tombstones Made by Val

Here are five of my many wood tombstone designs, with varying heights and widths. Each come with a wood stand that gets screwed into the bottom of the tombstone and two eight inch metal spikes to hold the tombstone into the ground. If you know of anyone that would love to purchase one of these, get a hold of me!

Gosh, do you love love love Halloween as much as I do?

What Do You Want On Your Tombstone?

I wanted to spruce up a shelf on our bookshelf with the arrival of Halloween (right around the corner), and as I was looking at a small pile of cardboard scraps heading into the recycle bin…I had an idea.

I folded a piece of paper in half (long ways), and drew the shape of a tombstone on it, then cut it out. Now, I have a perfect sized small tombstone! I grabbed those cardboard scraps and traced small tombstones on every piece by tracing around my template I just cut out.

Cardboard Tombs2

Next, I took my X-acto knife and carefully cut out the cardboard tombstones. (with a cutting board underneath to protect the table)  And, before I forget to mention, I also cut out small triangles (as you can see in the above photo) that were glued to the back of the cardboard tombstones as a stand.  (if I had forgot to mention this, I know I would have had someone ask “how did you get the tombstones to stand up?”)

Once I had a bunch of cardboard tombstones cut out, I grabbed some spray paint and covered the cardboard with a nice coat of paint. Once dried, I took my white paint pen and also tried a gold Sharpie Marker and went to work writing on the tombstones.

Cardboard Tombs Painted

I’ve gotta tell you, once I started writing on them, I was hooked and wished I had cut out a few more cardboard tombstones because I thought of a few more funny epitaphs to write down. My Sweets will laugh when he finds the one I placed on his nightstand…”Death by my girlfriends snoring” (LOL)

Cardboard Tombs

So, what do you want on your tombstone?

Send me some of your funny epitaphs that I can use, because I want to make some more of these!

Killer Clowns Snuck Into Yard

Just when you thought it was safe to visit your front yard…
you see this…

Killer Clown

It’s not every day that we have killer clowns show up in our front yard, but yesterday was my Sweetie’s birthday. We both love love love Halloween, so I decided to pull out a few of our skellies to help pull off a front yard birthday greeting.

But they needed something. I found these awesome killer clown masks at KMart and thought they would look awesome on the skellies. Heck, everyone loves clowns on their birthday, right?! And what killer clown would look right without a shiny birthday hat on too!

Birthday Sign

I have been doodling lately a bunch of these 3D ribbons on paper, and thought to myself, I wonder how hard it would be to make one life-sized. Well, here is my first attempt at one and I think it turned out awesome!  The entire sign was made on the side of a cardboard box that I opened up.

Cardboard Cake

Since I made the birthday sign, I had to have a birthday cake to go along with it, so I grabbed another box and cutout a birthday cake, all from the side of a cardboard box.

Roy with Clown Skellies

Here is my Sweets with the killer clowns! He loved the front yard display and could not stop from laughing at the masks on the skellies!

Clowns at Night

Happy Birthday Sweetie!

Creating a New Garden Door

Our old garden door has seen better days, but it served its purpose – it kept out the deer and other critters from entering our garden. But, it needed to be changed out to a newer looking entrance!

If you know me, I always put my heart into all of my projects, and this garden door was no different. We made a trip to Home Depot and got some nice flat pieces of wood, a box of screws, a can of mahogany gel stain, and some outdoor polyurethane. (I already had some leftover black netting to use in between the door slats, phew)

The first thing that I needed to change with our new door, was the width of the entrance to the garden. The old door was just exactly wide enough for the lawn mower to wiggle its way into the garden area, and that was a pain in my neck. The new door was definitely going to be wider to allow me to get the mower back there and the wheelbarrow too.

I decided to do a “slats” look for the door because I fell in love with this look, as it is all over Pinterest right now. If you look up any fences, garden fences, or privacy fences, the new look are the horizontal slats, instead of the regular vertical ones. Love it!

So, with that in mind, I went to work. Measure twice, cut once! This is definitely a good motto to remember when working with wood. I cut the strips of wood for the height of the door, then two for the top and bottom. Basically, at this point, you are just making a frame for your door, then I measured the door frame to see what size of slats I will need to cut to use across the actual door.

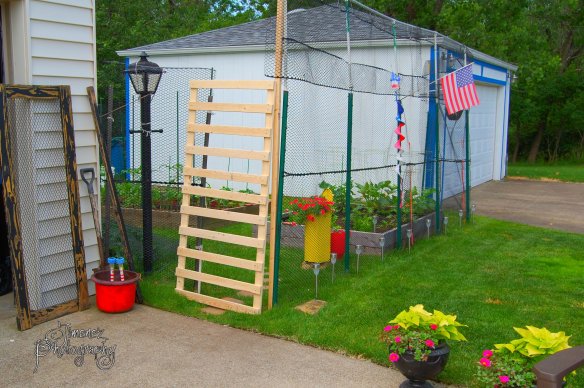
The photograph below shows the garden door before I attached it to my wood pole with hinges. Our new door is over 30+ inches in width, well wide enough to get the mower in the garden area now!

Garden Door 3

The photograph below is the new mahogany stained door with the black mesh attached to the inside of the door to keep the smaller critters out of the garden area. This look definitely matches the rest of the garden fence nicely.

Garden Door 1

Here is a photograph showing that I definitely used enough polyurethane on the door, eh! I took this pic right after it rained.

Garden Door 2

Now, I am working on building the little area next to the entrance so it matches the door. Two poles and more wood slats cut! Each slat has to be leveled too, so this process was never rushed. Each slat had to be screwed in place too.

Garden Door 4

The new addition next to the door is all stained and polyurethaned.

Garden Door 5

But, as you can see from the photograph below, I had to add the black mesh netting to this section to keep the small critters out! Now, everything matches just perfectly! Can you only imagine if I kept going all around the front of the garden area and did this? Boy, would that look so beautiful! (maybe next year!)

Garden Door 6

So, what do you think of our new garden door? What have you changed in your garden this year?

Growing Container Corn

I can definitely say that we stepped a little out of our boundaries this gardening seasoning, but not out of our comfort zone. If you have followed along with us through the years, you have read all about our successes and failures through our gardening adventures. Some things worked, some things grew & some did not, but that is what gardening is all about…the learning process, and to get fresh home grown veggies (of course).

Like I mentioned in the last post, we wanted to try to grow Container Corn (and yes, that is what the name is) from Burpee Seeds. We got a nice sized huge container, drilled lots of drain holes in the bottom of it, and placed it up on top of a few landscaping stones to level it a bit in the garden area. Then, we took a lot of soil and filled that container to the top. We only planted nine seeds because we wanted to follow the directions for growing container corn exactly as directed.

Guess what we got from all of that? We have corn stalks (nine of them) growing in our huge container! And, on each stalk, we have actual corn cobs growing & forming too! I know that we sound waaaaaay too happy to see corn growing on a “corn stalk” (but what else would you find on that stalk, eh?) But it is our pure excitement to see corn growing when we never ever grew it before in our backyard!  Another sweet success for sure! And, we should be getting two corn cobs on each stalk too!

The photograph below is from June, so you can see how short the stalks were. By the time Fourth of July rolled around, well….you know the old saying “knee high by the Fourth of July” and our corn stalks were at that & more!

6-15-15 Container Corn

The photograph below is from current day! Each stalk has at least one corn cob on it, and the second cob should  be starting to form shortly!

Container Corn

Growing container corn has definitely been fun to watch! In a million years, we would have never guessed that we could grow corn in our small backyard, but to our surprise, anyone can! As long as you have a huge container & good drainage, you can do it too! (perhaps you can try it next year too!)

Ear of Corn

Have you tried to grow anything different this gardening season that you have not grown before? I would love to hear what you have tried!

Gardening: Trying Something Different

One thing about gardening, is that you never know what will happen from day to day. This is such a true fact.

We are trying a few new things this year in our garden that we are excited about. One, we are trying to grow Container Corn from Burpee Seeds, and so far, we are having phenomenal success, as the corn is growing so well & getting taller every day.  Number Two, we are growing celery for the first time and started it from seed indoors and it has also taken off and has grown by leaps and bounds, and last but not least, Number Three, we are growing Loofahs!

Yes, you heard that correctly, we are attempting to grow Loofah Sponges, ya know those things you use in the bathroom for exfoliation.  For every person we have asked “where do you think Loofahs come from?”, they all answered “the ocean”.  Wrong!  Loofah’s grow from a black seed!  We have four Loofah plants growing in our garden right now! We have a friend of ours that thinks that we are telling them a fib about the loofah, because they don’t believe that a loofah can be grown in a container, as they too said that they come from the ocean. Well, all we want (to prove them wrong) is for one loofah to grow and produce a nice sized loofah.

L1

If you take a close look at the small growing loofah, it has an interesting texture on it. A loofah is from the squash family if I am not mistaken, and it needs to be pollinated for the loofah to produce & grow. The tip of the ones shown are waiting for the flower to open up. Once the Loofah is pollinated, it will grow into a nice sized Loofah where we will have to cut the skin off the outside of the Loofah, then hang it to dry outside. All the black seeds will then at that time be removed so we can use them to grow more next year, once they are dried properly. Interesting stuff, eh?

Since we have planted four seeds, each vine is starting to produce quite a number of loofah’s on each vine, which is a good thing, since I would love to have a few of these actually grow into a loofah. All in all, gardening is truly fun and we are so glad that we tried something new this year in the garden, as it makes it fun heading into the garden each morning to see what has happened over night!  These are just a few closeups of the Loofahs, but there are little Loofahs popping up all over these vines right now!

L2

I will be slowly starting to get back into my garden posts, as I have taken a much needed break from blogging, so get ready for some awesome stuff!

How To Repair A Lawn

So you want to know how to repair your lawn to look lush and green? It’s easier than you think, and does not take that much time to do. Follow these simple steps and your lawn will look nice and green again!

First of all, I love dirt. I love digging my hands into a good pile of dirt and feeling it crumble between my fingers. It must be a gardener thing, ya know. The other reason I do this is because I can break up the soil by hand so there are no clumps when I lay the soil before I seed.

You all remember the mess I had in the backyard in the Poop Pit after our long Winter, and I was left with lots of lawn damage. I deal with this every year, but it is rather easy to get your lawn back to “green” again.

If you have any spots in your yard that need some extra attention, you too can get your lawn green again by following these simple steps.

STEP ONE

Remove any dead grass in your yard either by raking it up or by sliding an edging shovel over the area.

POOP PIT NEEDS FIXING

STEP TWO

Get your topsoil ready and start laying it down in the area. This is where I dump a nice pile of topsoil down and then break it up by hand. I used to use a garden rake to distribute the soil, but then I can’t see how much topsoil was laid, so I just choose to move the topsoil around in these spots by hand. (I know what you are thinking, “Wow, that’s a lot of work”, but it’s not) You want your soil to be loose, but not too loose. (after you water it, it will compact)

SOIL AND SEED

STEP THREE

After you have completely filled in all the areas with a nice layer of topsoil, it is time to seed! But before you lay your seed down, this is the time to check to make sure you have enough soil laid down. My rule of thumb is, lay just enough soil down so that it does not rise above the blade of grass in your lawn. This is also the time to fill in those dips you might have in your lawn too, and all you will have to do is lay a little more topsoil in those areas to make your lawn nice and flat. (tamp down those areas that you are filling in, but make sure the surface is scratched up so that the grass seed has something to grab onto when the seed starts to germinate)

LAYING SOILOnce you feel that you have completely covered all the areas you need with the topsoil, it is time to spread your seed. You can lay your grass seed in two ways, or however you are comfortable with, but you want an even distribution of your seed. Either throw the seed by hand if you are comfortable with this way or if you have just a few spots in the lawn that you are fixing, or use a seed spreader which is what I am going to do because I have a larger area that I need to seed.

SOIL

Make sure you use the correct seed for your growing zone and also make sure you use the right seed, either sun or shade seed too! You can also lay a light layer of straw over the top to protect the seed from the birds.

SOIL2

STEP FOUR

Now that your seed is laid, it is time to water! Fresh seed should never be allowed to dry out, or it will not germinate. Make sure that you don’t walk over the area that you have just seeded, so if you have dogs you might want to move them to another area when they head outside. You want to give your seed a chance to grow before anyone walks over this area.

SOIL3

Getting your lawn back in shape is easier than you think, and now is the time to head outside and tackle your lawn problem spots!